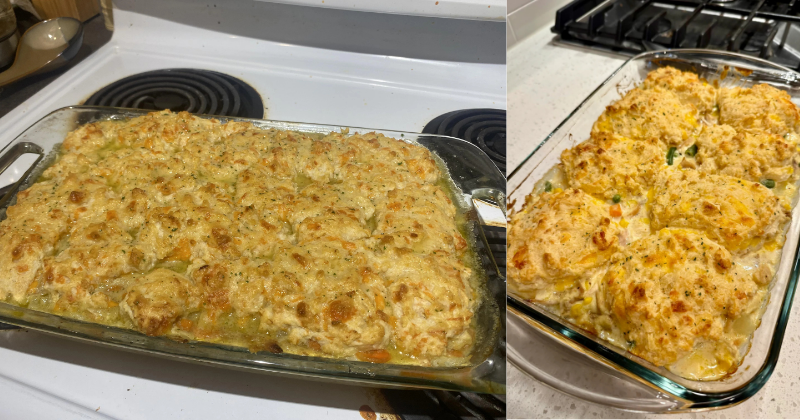
There’s something profoundly satisfying about transforming two beloved comfort foods into one spectacular dish. Cheddar Bay Biscuit Chicken Cobbler combines the savory richness of a hearty chicken pot pie filling with the irresistible allure of buttery, cheese-laden biscuits reminiscent of those famous Red Lobster favorites. This recipe represents more than mere convenience—it’s a culinary embrace on a cold evening, a dish that brings families together around the table with anticipation.
Through countless kitchen experiments, I’ve discovered that the magic lies in achieving the perfect balance: a creamy, herb-infused chicken filling that bubbles beneath a crown of golden biscuits, their tops glistening with garlic butter and studded with sharp cheddar. The aroma alone—that intoxicating combination of roasted garlic, melted cheese, and fresh herbs—transforms any kitchen into a sanctuary of warmth. This is comfort food elevated, a recipe that honors tradition while embracing innovation.
What Makes This Cheddar Bay Biscuit Chicken Cobbler Special
This recipe distinguishes itself through its architectural layers of flavor and texture. Unlike traditional chicken pot pies that require blind-baking crusts and complex assembly, this cobbler embraces simplicity without sacrificing sophistication. The filling develops deep, savory notes through proper browning and seasoning, while the Cheddar Bay-inspired biscuits provide both visual drama and textural contrast.
Difficulty Level: Intermediate
Time Commitment: 1 hour 15 minutes (including prep and baking)
Ideal Occasions: Sunday family dinners, potluck gatherings, meal prep for busy weeks, or any moment requiring culinary comfort
The beauty of this dish lies in its forgiving nature—home cooks can master it with attention to basic techniques, yet it presents elegantly enough for special occasions.
Ingredients
For the Chicken Filling:
- 3 tablespoons unsalted butter
- 1 medium yellow onion, diced (about 1 cup)
- 3 medium carrots, peeled and diced (about 1 cup)
- 3 celery stalks, diced (about 3/4 cup)
- 4 cloves garlic, minced
- 1/3 cup all-purpose flour
- 2 1/2 cups chicken stock, preferably homemade
- 1 cup whole milk
- 3 cups cooked chicken breast, shredded or cubed
- 1 cup frozen peas
- 1 teaspoon dried thyme
- 1/2 teaspoon dried sage
- 1 bay leaf
- Salt and freshly ground black pepper to taste
- 1/4 teaspoon red pepper flakes (optional)
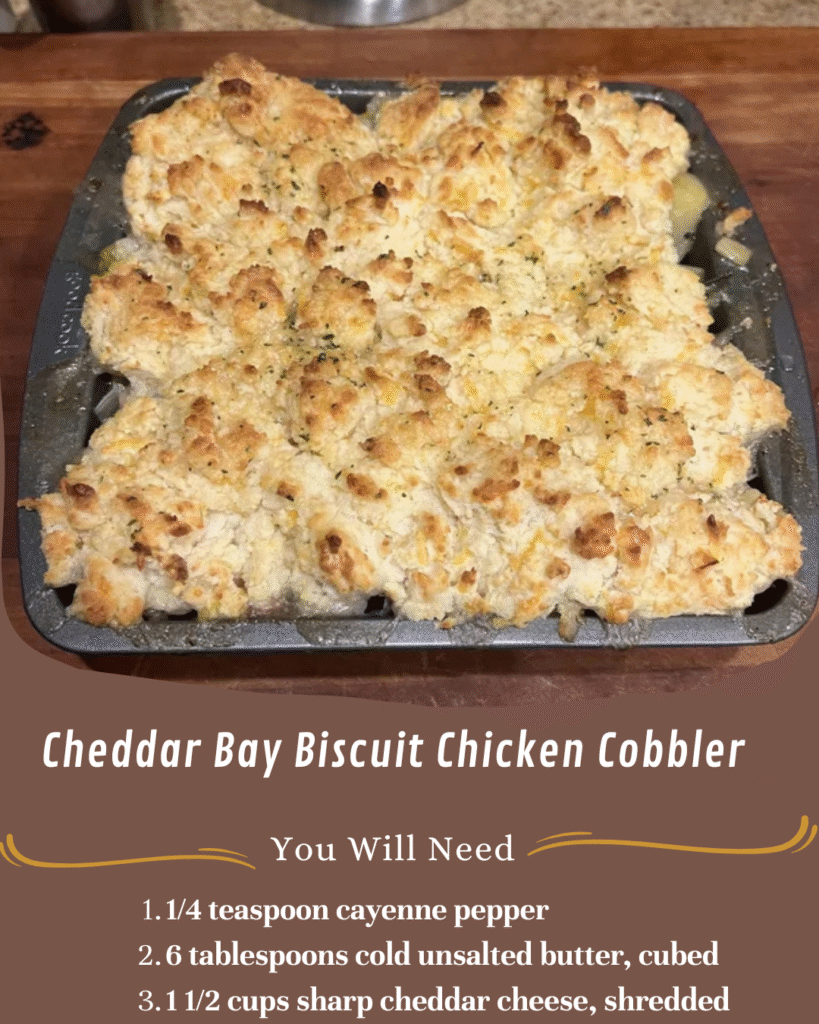
For the Cheddar Bay Biscuits:
- 2 cups all-purpose flour
- 1 tablespoon baking powder
- 1 tablespoon granulated sugar
- 1 teaspoon garlic powder
- 1/2 teaspoon salt
- 1/4 teaspoon cayenne pepper
- 6 tablespoons cold unsalted butter, cubed
- 1 1/2 cups sharp cheddar cheese, shredded
- 3/4 cup cold buttermilk
- 2 tablespoons fresh parsley, finely chopped
For the Garlic Butter Topping:
- 3 tablespoons melted butter
- 2 cloves garlic, minced
- 1/4 teaspoon garlic powder
- 1 tablespoon fresh parsley, chopped
Step-by-Step Instructions
- Preheat and prepare: Set your oven to 375°F (190°C). Select a 9×13-inch baking dish or a large cast-iron skillet—the vessel matters, as it affects heat distribution and presentation.
- Build the flavor foundation: In a large, heavy-bottomed skillet over medium heat, melt the butter until it foams gently. Add the diced onion, carrots, and celery. Cook for 8-10 minutes, stirring occasionally, until the vegetables soften and the onions turn translucent with golden edges. This patience pays dividends in flavor depth.
- Introduce aromatics: Stir in the minced garlic and cook for 60 seconds until fragrant but not browned—garlic’s sweetness emerges just before it risks bitterness.
- Create the roux: Sprinkle the flour over the vegetables, stirring constantly to coat everything evenly. Cook for 2 minutes, allowing the flour to lose its raw taste while creating a blonde roux that will thicken your filling beautifully.
- Develop the sauce: Gradually pour in the chicken stock, whisking continuously to prevent lumps from forming. Add the milk, thyme, sage, and bay leaf. Bring the mixture to a gentle simmer, then reduce heat to medium-low. Let it cook for 5-7 minutes until the sauce thickens to coat the back of a spoon.
- Complete the filling: Fold in the shredded chicken and frozen peas. Season generously with salt and black pepper—taste and adjust, as this is your moment to perfect the savory balance. Remove the bay leaf. If using, add the red pepper flakes for subtle warmth. Pour the filling into your prepared baking dish and set aside.
- Prepare the biscuit dough: In a large mixing bowl, whisk together flour, baking powder, sugar, garlic powder, salt, and cayenne pepper. Add the cold butter cubes and use a pastry cutter or your fingertips to work the butter into the flour until the mixture resembles coarse sand with pea-sized butter pieces remaining—these create flaky layers.
- Incorporate cheese and liquid: Stir in the shredded cheddar cheese and fresh parsley. Pour in the cold buttermilk and gently fold with a spatula just until the dough comes together. The mixture will appear shaggy and slightly sticky—resist overmixing, which develops gluten and creates tough biscuits.
- Top the cobbler: Using a large spoon or ice cream scoop, drop generous portions of biscuit dough over the chicken filling, leaving small gaps for steam to escape. The rustic, uneven appearance is part of the charm—they’ll spread and merge slightly during baking.
- Bake to golden perfection: Place the cobbler in the preheated oven and bake for 30-35 minutes until the biscuits turn golden brown and the filling bubbles enthusiastically around the edges.
- Apply the signature finish: While the cobbler bakes, combine the melted butter, minced garlic, garlic powder, and parsley for the topping. When the cobbler emerges from the oven, immediately brush this aromatic butter over the hot biscuits, allowing it to soak into every crevice.
- Rest before serving: Let the Cheddar Bay Biscuit Chicken Cobbler rest for 10 minutes before serving. This allows the filling to set slightly and the flavors to harmonize.
Tips and Tricks for Perfect Results
Ingredient Substitutions: The beauty of this recipe lies in its adaptability. Replace chicken with leftover turkey for a post-Thanksgiving transformation, or use rotisserie chicken to save precious time. Swap buttermilk with regular milk mixed with 1 tablespoon lemon juice—let it sit for 5 minutes to curdle slightly. For a lighter version, substitute half-and-half for whole milk, though you’ll sacrifice some richness.
Storage Instructions: Store leftover cobbler in an airtight container in the refrigerator for up to 3 days. The biscuits soften over time, absorbing moisture from the filling—some consider this a feature rather than a flaw. Reheat individual portions in a 350°F oven for 15-20 minutes to restore some crispness to the biscuit tops, or use a microwave for convenience, accepting the softer texture.
Make-Ahead Strategy: Prepare the chicken filling up to 24 hours in advance and refrigerate. When ready to serve, reheat the filling on the stovetop until warm, transfer to your baking dish, prepare fresh biscuit dough, and proceed with assembly. Alternatively, mix the dry biscuit ingredients and cube the butter ahead of time, storing them separately in the refrigerator—combine with buttermilk just before baking for optimal rise.
Common Mistakes to Avoid: The most frequent error involves overworking the biscuit dough, which develops gluten strands and results in dense, tough biscuits rather than tender, fluffy clouds. Handle the dough minimally and stop mixing the moment it comes together. Another pitfall: using warm butter in the biscuit dough. Cold butter creates steam pockets during baking, yielding those coveted flaky layers. Finally, resist the temptation to skimp on seasoning the filling—it needs assertive flavoring to balance the rich biscuits.
Serving Suggestions: This Cheddar Bay Biscuit Chicken Cobbler stands magnificently on its own, but consider pairing it with a crisp green salad dressed in bright vinaigrette to cut through the richness. A simple arugula salad with lemon and parmesan provides elegant contrast. For a more substantial meal, roasted Brussels sprouts or green beans almondine complement the dish beautifully without overwhelming it.
Texture Perfection: For extra-crispy biscuit tops, position your oven rack in the upper third of the oven during the final 5 minutes of baking. Watch carefully to prevent burning. If the biscuits brown too quickly while the filling remains pale, tent loosely with aluminum foil and continue baking.
Flavor Variations: Transform this recipe by adding 1/2 cup white wine to the sauce during step 5 for sophisticated depth. Incorporate fresh herbs like rosemary or tarragon for aromatic complexity. For mushroom lovers, sauté 8 ounces of sliced cremini mushrooms with the vegetables—their earthy umami enhances the savory profile remarkably.
Nutritional Information
Per Serving (based on 8 servings):
- Calories: 485
- Total Fat: 24g
- Saturated Fat: 13g
- Cholesterol: 95mg
- Sodium: 680mg
- Total Carbohydrates: 38g
- Dietary Fiber: 3g
- Sugars: 6g
- Protein: 28g
These values are approximate and will vary based on specific ingredients used and portion sizes. For those monitoring sodium intake, use low-sodium chicken stock and reduce added salt accordingly.
Frequently Asked Questions
Can I use frozen vegetables instead of fresh?
Absolutely, though the technique requires slight adjustment. Frozen vegetable medleys work wonderfully in this Cheddar Bay Biscuit Chicken Cobbler, offering convenience without significant flavor sacrifice. However, avoid adding frozen vegetables directly to the roux, as their moisture content can disrupt the sauce consistency. Instead, thaw and drain them thoroughly before incorporating into the filling during step 6. The National Center for Home Food Preservation notes that frozen vegetables are often processed at peak freshness, preserving nutrients effectively. For best results, pat them dry with paper towels to remove excess moisture.
How do I prevent my biscuits from sinking into the filling?
This common concern has a straightforward solution rooted in temperature and texture. Ensure your filling has thickened adequately during step 5—it should have a consistency similar to thick gravy, not watery soup. Allow the filling to cool for 5-10 minutes before adding the biscuit dough; this prevents the cold dough from immediately melting on contact. Additionally, make your biscuit dough slightly thicker by reducing buttermilk by 2 tablespoons if your kitchen runs particularly warm. The biscuits naturally settle somewhat during baking, creating that desirable cobbler texture where biscuit and filling intermingle at the edges.
What’s the best way to reheat leftovers without drying them out?
Reheating requires balancing moisture retention with texture restoration. For oven reheating, place individual portions in oven-safe dishes, cover loosely with foil, and warm at 325°F for 15-20 minutes. Remove the foil during the final 5 minutes to crisp the biscuit tops slightly. Add a tablespoon of chicken stock or milk to the filling before reheating if it appears dry. For microwave reheating, cover the dish with a damp paper towel to trap steam, heating in 1-minute intervals. The microwave method sacrifices some textural integrity but preserves the filling’s moisture beautifully—perfect for quick lunches.
Can this recipe be made in individual ramekins?
Individual portions transform this cobbler into an elegant dinner party offering. Divide the filling among 6-8 oven-safe ramekins (approximately 10-12 ounces each), filling them three-quarters full. Top each with a smaller portion of biscuit dough—roughly 1/4 cup per ramekin. Reduce baking time to 20-25 minutes, checking for golden-brown biscuit tops and bubbling filling. Individual cobblers bake more quickly due to increased surface area, so monitor closely. This presentation allows guests to enjoy their own perfectly portioned servings, complete with that satisfying crust-to-filling ratio in every bite.
How can I make this recipe gluten-free?
Converting this Cheddar Bay Biscuit Chicken Cobbler to gluten-free requires substituting both the roux thickener and biscuit flour. For the filling, replace all-purpose flour with equal parts cornstarch or a gluten-free flour blend designed for thickening (reduce quantity by one-quarter, as cornstarch has greater thickening power). For biscuits, use a quality gluten-free baking flour blend containing xanthan gum—King Arthur Measure for Measure or Bob’s Red Mill 1-to-1 work excellently. The texture differs slightly from traditional biscuits, leaning more cake-like, but the flavor profile remains delicious. Ensure your baking powder is certified gluten-free, as some brands contain wheat-based additives.
What chicken preparation method works best for this recipe?
The choice between cooking methods depends on your time constraints and flavor preferences. Poaching chicken breasts in seasoned broth yields tender, moist meat that shreds beautifully and absorbs the filling’s flavors—ideal for this application. Rotisserie chicken offers convenience and pre-seasoned flavor, though it can be slightly drier; compensate by adding an extra 1/4 cup of stock to the filling. Leftover roasted or grilled chicken works wonderfully, bringing subtle smoky notes. Avoid using raw chicken directly in the filling, as the baking time doesn’t allow for proper cooking. The USDA recommends cooking chicken to an internal temperature of 165°F, which should occur before incorporation into the cobbler filling.
Conclusion
This Cheddar Bay Biscuit Chicken Cobbler represents comfort food at its finest—a dish that transforms simple ingredients into something memorable through technique and attention to detail. The marriage of creamy, herb-scented chicken filling with those iconic cheese-studded, garlic-butter-brushed biscuits creates a meal that satisfies on every level: visually appealing, aromatically intoxicating, and deeply delicious.
As you prepare this recipe, remember that cooking is both science and intuition. Follow the techniques outlined here, but don’t hesitate to adjust seasonings to your preference or incorporate ingredients that speak to your family’s tastes. Each time you make this cobbler, you’ll refine your approach, discovering small improvements that make it uniquely yours.
I encourage you to gather your loved ones around the table with this Cheddar Bay Biscuit Chicken Cobbler. Share the experience, savor each bite, and perhaps share your results—the modifications you made, the reactions you received, the memories you created. After all, the finest recipes are those that bring people together, creating moments of connection over exceptional food.
Prep Time: 25 minutes
Cook Time: 50 minutes
Total Time: 1 hour 15 minutes
Yield: 8 servings
Equipment needed: 9×13-inch baking dish or large cast-iron skillet, large heavy-bottomed skillet, mixing bowls, whisk, pastry cutter (optional)Réessayer