Growing peanuts at home is surprisingly accessible and rewarding, requiring minimal space while offering fresh, organic legumes with superior flavor to store-bought varieties. This comprehensive guide covers the complete cultivation process from seed selection through harvest, enabling successful peanut production in gardens or containers.
Understanding Peanut Biology and Growth Requirements
Peanuts (Arachis hypogaea) belong to the Fabaceae family and exhibit a unique botanical characteristic called geocarpy—the phenomenon where fertilized flowers develop elongated structures called pegs that grow downward, penetrating the soil where pods develop underground. This growth pattern distinguishes peanuts from most cultivated crops and directly influences cultivation techniques.
The plant originates from South American regions with warm climates, establishing fundamental environmental parameters for successful cultivation. Peanuts require temperatures between 20-30°C (68-86°F) for optimal growth, with soil temperatures above 18°C (65°F) essential for germination. The growing season spans 120-150 days depending on variety, making timing crucial in temperate regions with shorter frost-free periods.
Three primary varieties dominate home cultivation: Runner types produce uniform pods ideal for processing, Virginia varieties yield large kernels preferred for roasting, while Spanish peanuts mature faster with smaller, intensely flavored nuts suitable for confined spaces. Valencia peanuts, a fourth category, produce three or more kernels per pod and offer sweet flavor profiles.
Soil Preparation and Site Selection
Successful peanut cultivation begins with appropriate soil conditions. Peanuts thrive in loose, well-draining sandy loam with pH levels between 5.9-6.3. Heavy clay soils impede peg penetration and pod development, while excessively sandy substrates may lack nutrient retention capacity. The soil structure must accommodate downward peg growth while maintaining adequate moisture without waterlogging.
Incorporating organic matter improves soil structure regardless of base composition. Adding 5-8 cm of aged compost or well-decomposed manure to the top 20-25 cm of soil enhances both drainage in heavy soils and water retention in sandy conditions. This amendment also introduces beneficial microorganisms that support nitrogen fixation—a process where root nodule bacteria convert atmospheric nitrogen into plant-available forms.
Site selection prioritizes full sun exposure, defined as minimum six hours of direct sunlight daily, preferably eight or more. Insufficient light reduces flowering intensity and consequently pod production. The planting area should avoid locations where tomatoes, peppers, or other Solanaceae family members grew recently, as these crops may harbor similar soil pathogens.
Calcium availability significantly impacts pod filling and kernel development. Peanuts require calcium during the reproductive phase when pods form underground. Testing soil calcium levels before planting and incorporating gypsum (calcium sulfate) at 225-450 grams per square meter addresses deficiencies without altering soil pH, unlike lime which raises pH levels.
Seed Selection and Pre-Planting Treatment
Raw, unroasted peanuts with intact seed coats serve as planting material. Commercial roasted peanuts undergo heat treatment that destroys viability. Sourcing from garden centers, agricultural suppliers, or specialized seed companies ensures viable seeds, though fresh raw peanuts from natural food stores occasionally germinate successfully if recently harvested.
Examining seeds before planting identifies damaged or diseased specimens. Viable peanut seeds display firm texture, intact seed coats without discoloration, and absence of mold or insect damage. Shelling peanuts carefully preserves the papery seed coat—the reddish-brown layer covering kernels—which contains germination-inhibiting compounds that dissolve during the initial moisture uptake phase.
Some growers employ pre-germination soaking, submerging seeds in room-temperature water for 8-12 hours before planting. This technique jumpstarts the germination process, though it also increases vulnerability to fungal pathogens if soil conditions remain excessively wet. In cooler climates or heavy soils, planting dry seeds may prove more reliable, while pre-soaking benefits sandy soils with rapid drainage.
Inoculating seeds with Bradyrhizobium bacteria enhances nitrogen fixation capacity. These specialized bacteria colonize root nodules, converting atmospheric nitrogen into ammonia compounds accessible to plant tissues. Commercial inoculants designed for peanuts or general legumes coat seeds just before planting, establishing beneficial bacterial populations early in development.
Planting Techniques and Spacing Considerations
Direct sowing after the last frost date when soil temperatures stabilize above 18°C yields best results. Premature planting in cold soil invites fungal diseases and poor germination. In regions with short growing seasons, starting seeds indoors 3-4 weeks before transplanting extends the cultivation window, though peanuts tolerate transplanting less readily than many crops due to taproot sensitivity.
Planting depth directly influences emergence rates and seedling vigor. Positioning seeds 3-5 cm deep in loose soil balances moisture access with sufficient coverage. Deeper planting in sandy soils prevents desiccation, while shallower depths suit heavier soils where emergence through dense material challenges seedlings. Spacing seeds 15-20 cm apart within rows and maintaining 60-75 cm between rows accommodates mature plant spread and facilitates cultivation activities.
Container cultivation enables peanut growing where garden space limits production. Containers require minimum 30 cm depth to accommodate root systems and peg development, with 40 cm depth preferable. A single plant needs approximately 30 cm diameter growing space. Container medium should comprise equal parts potting soil, compost, and sand or perlite, creating the loose, friable structure peanuts require for successful pod formation.
Raised beds offer advantages in regions with problematic native soil. Constructing beds 25-30 cm high filled with custom soil blends overcomes drainage issues, compaction, or pH imbalances. The elevated structure also warms faster in spring, enabling earlier planting compared to ground-level beds.
Water Management and Irrigation Strategies
Peanuts demonstrate complex water requirements that vary throughout growth stages. Initial establishment requires consistent moisture to support germination and seedling development, typically needing 2-3 cm of water weekly through rainfall or irrigation. Once established, plants tolerate brief dry periods, though extended drought reduces yields and pod quality.
The critical irrigation period occurs during flowering and peg development—approximately 60-90 days after planting depending on variety. Insufficient moisture during this phase impairs peg formation and underground pod development. Maintaining evenly moist soil without waterlogging supports optimal pod filling. Soil should feel like a wrung-out sponge, retaining structure when squeezed while releasing minimal water.
Overhead irrigation proves less suitable than drip systems or soaker hoses, particularly during flowering. Wet foliage increases fungal disease susceptibility, including leaf spot pathogens that reduce photosynthetic capacity. Ground-level watering delivers moisture to root zones while keeping foliage dry, reducing disease pressure while improving water efficiency.
Monitoring soil moisture at 10-15 cm depth provides accurate assessment of plant water availability. Surface soil dries rapidly, potentially misleading growers about deeper moisture levels where roots actively absorb water. Inserting a finger or moisture meter to this depth reveals actual conditions affecting plant performance.
Nutrient Management and Fertilization Approaches
Peanuts exhibit unique nutritional requirements due to their nitrogen-fixing capability. Unlike most crops requiring substantial nitrogen fertilization, peanuts produce significant nitrogen internally through bacterial symbiosis. Excessive nitrogen application promotes vegetative growth at flowering and pod development expense, reducing yields while increasing foliar disease susceptibility.
Pre-planting fertilization emphasizing phosphorus and potassium supports vigorous growth without overstimulating vegetative tissues. Applying balanced fertilizer with reduced nitrogen ratios, such as 5-10-10 formulations at manufacturer-recommended rates, provides essential nutrients without excessive nitrogen. Alternatively, incorporating bone meal (phosphorus source) and greensand or wood ash (potassium sources) offers organic nutrition.
Side-dressing with calcium during early flowering ensures adequate supply during critical pod development. Broadcasting gypsum around plant bases when first flowers appear, followed by light incorporation through gentle cultivation or watering-in, delivers calcium to developing pods. Calcium deficiency manifests as poorly filled pods, hollow kernels, or darkened seed coats, collectively termed « pops » in agricultural terminology.
Observing foliage provides nutrient status indicators. Dark green leaves signal adequate nitrogen, while yellowing between veins suggests iron deficiency in high-pH soils. Purplish leaf tints indicate phosphorus deficiency, though this symptom also appears in cold-stressed plants. Scorched leaf margins point toward potassium deficiency or salt accumulation in container plantings.
Cultivation Practices and Weed Management
Shallow cultivation during early growth controls weeds without disturbing developing root systems. Peanut roots spread laterally in upper soil layers, making deep cultivation detrimental after initial establishment. Hand weeding or careful hoeing within 2-3 cm of soil surface removes competing vegetation while preserving root integrity.
Hilling—the practice of mounding soil around plant bases—benefits peanut production by creating loose soil mass for peg penetration. Performing this operation when plants reach 25-30 cm height, coinciding with early flowering, establishes friable medium where pegs easily penetrate and pods develop. The mounded soil should extend 10-15 cm up stems, creating gentle slopes rather than steep sides that shed water.
Mulching offers mixed results with peanuts. Organic mulches conserve moisture and suppress weeds, but may impede peg soil penetration if applied too thickly. Light mulch applications of 2-3 cm depth using fine materials like grass clippings or aged compost provide benefits without obstruction. Avoiding mulch contact with stems reduces fungal disease risks associated with persistent moisture.
Container-grown peanuts require more frequent cultivation or hand weeding since confined spaces intensify weed competition. Monitoring containers weekly during active growth allows prompt removal of emerging weeds before they establish extensive root systems competing for limited resources.
Pest and Disease Monitoring
Peanuts face relatively few serious pests in home garden settings compared to commercial production. Aphids occasionally colonize tender growth, excreting honeydew that supports sooty mold development. Strong water sprays dislodge light infestations, while insecticidal soap controls persistent populations. Avoiding excessive nitrogen reduces succulent growth that attracts aphids.
Leafhopper feeding creates stippling patterns on foliage and potentially transmits viral diseases in severe infestations. These small, wedge-shaped insects jump readily when disturbed. Reflective mulches disorient leafhoppers, reducing landing frequency, while row covers exclude them entirely until flowering necessitates pollinator access.
Southern blight (Sclerotium rolfsii) represents the most serious fungal disease affecting peanuts, particularly in warm, humid climates. This soil-borne pathogen produces white mycelial mats at soil lines, eventually girdling stems and causing plant collapse. Crop rotation extending 3-4 years between peanut plantings in the same location reduces inoculum buildup. Raising soil pH toward neutral through lime applications creates less favorable conditions for this acid-loving fungus.
Leaf spot diseases manifest as circular brown lesions on foliage, reducing photosynthetic area when severe. These fungal pathogens thrive in humid conditions with overhead watering. Ground-level irrigation, adequate plant spacing for air circulation, and removing heavily infected leaves limits disease progression. Organic fungicides containing copper or biological controls offer treatment options for persistent infections.
Flowering Biology and Pollination Dynamics
Peanut flowers emerge from leaf axils as small, pea-like blooms in yellow or orange hues. Individual flowers open for single days, typically in morning hours. Self-pollination occurs before or during flower opening, eliminating dependence on insect pollinators—though bees visit flowers occasionally. This autonomous pollination ensures pod set even in isolated plantings or screened enclosures.
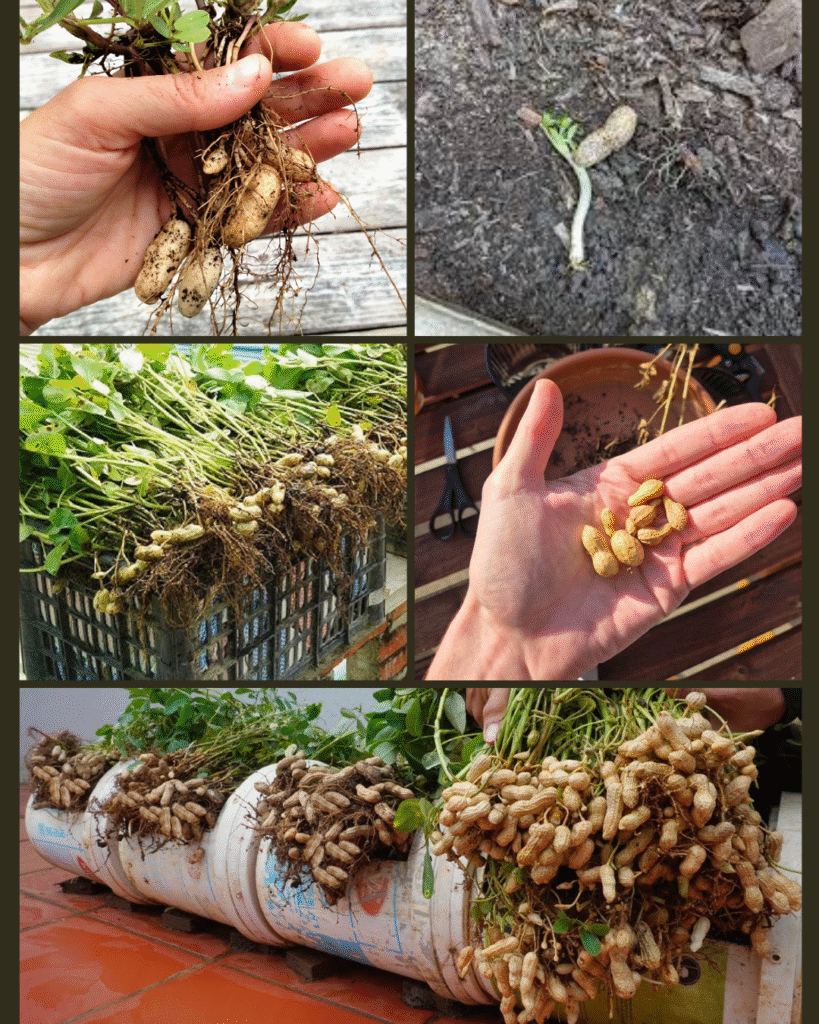
Following successful pollination, the flower wilts and a structure called the peg begins elongating from the fertilized ovary. This remarkable growth response directs the developing pod downward, requiring 5-7 days to penetrate soil. Pegs exhibit negative phototropism and positive gravitropism—growing away from light and toward gravity. Only pegs reaching soil mature into pods; aerial pegs eventually abort without contributing to yield.
The pegging phase extends over several weeks as plants continuously produce flowers and subsequent pegs. A single plant may generate 40 or more pegs, though typically only 20-35 mature into harvestable pods. Environmental stresses during this period, including water deficit, extreme temperatures, or calcium deficiency, reduce successful pod development from emerged pegs.
Recognizing Maturity and Harvest Timing
Determining harvest readiness challenges growers since pods develop underground, obscuring visual inspection. Peanuts require 120-150 days from planting to maturity depending on variety and growing conditions. Monitoring multiple indicators ensures harvest at optimal ripeness when kernels achieve maximum size and oil content without excessive field exposure that invites pod deterioration.
Foliage provides initial maturity signals. Lower leaves yellow and begin dropping as plants redirect energy to pod maturation. This senescence pattern progresses upward through the canopy as harvest approaches. Stems may lose some green coloration, taking on straw-like tones, though plants typically retain living foliage at harvest unlike grain crops that completely die back.
Excavating test pods offers direct maturity assessment. Carefully digging around plant bases exposes several pods for examination without disturbing the entire plant. Mature pods display darkened shell interiors with visible vein patterns when opened. Kernels fill pods completely, and the seed coat achieves full color—ranging from pink to red depending on variety. Immature pods show white or cream interiors with shriveled kernels only partially filling cavities.
Timing harvest involves balancing competing factors. Early harvest while foliage remains green facilitates plant removal and reduces pod losses to decay, though some pods may not reach full maturity. Delayed harvest increases late-forming pod maturation but risks losses to soil-borne fungi, rodents, or difficult extraction from wet autumn soils. Most home growers target harvest when 70-80% of pods show maturity indicators.
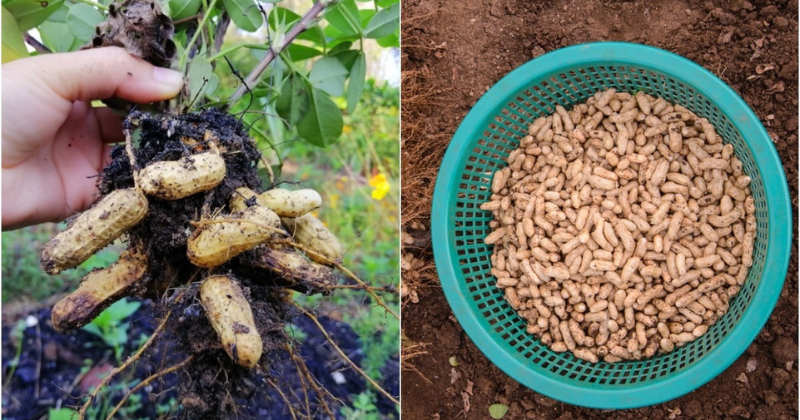
Harvesting Techniques and Curing Processes
Harvest begins by loosening soil around plants using a garden fork inserted 15-20 cm from stems. Lifting carefully preserves peg attachments to pods, though some inevitably detach and require hand-recovery from soil. Shaking plants vigorously dislodges adhering soil while maintaining pod connections. Container-grown plants dump easily, allowing thorough pod collection from loosened growing medium.
Freshly harvested peanuts contain 25-50% moisture and require curing to prevent mold development during storage. The curing process reduces moisture to 8-10%, enabling long-term storage while developing characteristic flavor compounds. Hanging plants in warm, dry locations with good air circulation for 2-3 weeks accomplishes this gradual drying. Ideal curing environments maintain 25-30°C with low humidity.
Alternatively, removing pods from vines and spreading them in single layers on screens or newspapers in similar warm, dry conditions achieves curing. This method requires more space but allows faster processing of large harvests. Stirring or rotating pods daily ensures even drying throughout the batch.
Testing dryness determines curing completion. Properly cured peanuts rattle inside shells when shaken, and kernels snap cleanly when bent rather than bending flexibly. Over-drying makes kernels excessively brittle and reduces eating quality, while under-dried peanuts remain vulnerable to storage molds including aflatoxin-producing Aspergillus species.
Post-Harvest Processing and Storage
Following curing, removing pods from vines and discarding damaged or diseased specimens prepares peanuts for storage. Sorting identifies three categories: premium pods showing no defects, cooking-grade pods with minor blemishes suitable for immediate use, and reject pods with mold, insect damage, or other serious flaws requiring disposal. This quality separation ensures that storage focuses on premium specimens with longest keeping potential.
Storing unshelled peanuts in breathable containers like mesh bags, paper sacks, or ventilated bins in cool, dry locations extends storage life for several months. Temperatures around 10°C with relative humidity below 70% create optimal conditions. Avoiding sealed plastic containers prevents condensation that encourages mold growth. Periodic inspection throughout storage identifies emerging problems before entire batches deteriorate.
Shelling peanuts for kitchen use reveals final kernel quality. Blanching—removing the thin seed coat—occurs through brief boiling followed by rubbing between towels, or dry roasting and manual removal. Home-grown peanuts often display size variation and irregular kernel shapes compared to commercial products selected for uniformity, though flavor frequently surpasses mass-produced alternatives.
Roasting develops flavor through Maillard reactions between amino acids and sugars. Spreading raw kernels in single layers on baking sheets and roasting at 160-175°C for 15-20 minutes, stirring every 5 minutes, produces evenly browned nuts. Roasting time adjustments accommodate personal preferences from light roasting preserving subtle flavors to darker roasting developing intense, caramelized notes.
Yield Expectations and Production Optimization
Home peanut cultivation typically produces 450-900 grams of cured, in-shell peanuts per square meter under favorable conditions. Individual plant yields range from 30-90 grams depending on variety, growing conditions, and cultivation practices. These figures represent successful harvests; suboptimal conditions including poor soil preparation, inadequate watering during critical periods, or pest and disease issues reduce yields substantially.
Optimizing production requires integrating multiple factors discussed throughout this guide. Proper variety selection matching climate and space limitations, thorough soil preparation emphasizing loose structure and appropriate pH, timely planting ensuring adequate growing season duration, consistent moisture during flowering and pegging, and careful harvest timing collectively determine success levels.
Documenting cultivation experiences builds knowledge for subsequent seasons. Recording planting dates, variety selections, weather patterns, irrigation schedules, pest observations, and harvest results creates personalized reference material revealing what works in specific conditions. Small experimental variations between rows or containers—testing different spacing, fertilization rates, or watering frequencies—generate comparative data guiding future improvements.
Container production offers controlled experimentation opportunities. Growing several containers with identical plants but varying single factors isolates variable effects. This approach might test calcium application timing, mulching thickness, or watering frequency while maintaining other factors constant across containers.
Seed Saving and Variety Preservation
Home-grown peanuts serve as planting stock for subsequent seasons, enabling seed saving and variety preservation. Selecting largest, most productive plants as seed sources concentrates desirable traits through generations. Allowing these plants to mature fully, curing pods carefully, and storing under optimal conditions preserves viability for 12-18 months when handled properly.
Testing germination rates before spring planting identifies declining viability requiring fresh seed acquisition. Placing 10-20 seeds on moistened paper towels in sealed containers at room temperature reveals germination percentage within 7-10 days. Rates above 80% indicate excellent viability, while figures below 60% suggest obtaining fresh planting material.
Growing multiple peanut varieties simultaneously risks natural crossing, though the self-pollinating nature of peanuts minimizes this concern. Physical separation of 3-5 meters between varieties or staggered planting times preventing flowering overlap maintains varietal purity when saving seeds from multiple types.
Culinary Applications and Nutritional Considerations
Fresh peanuts offer culinary versatility beyond standard roasted snacking. Boiling green (immature) peanuts creates Southern regional specialties with soft, bean-like texture. Harvesting pods when kernels achieve full size but before complete maturation, then boiling in salted water for 2-4 hours produces this distinctive preparation.
Grinding roasted peanuts creates fresh peanut butter superior to commercial products in flavor complexity and texture customization. Food processors or high-powered blenders transform roasted kernels into spreads ranging from chunky to perfectly smooth depending on processing duration. Adding salt, honey, or oils adjusts consistency and flavor, though many prefer unadulterated peanut flavor.
Nutritionally, peanuts provide substantial protein (25-30%), healthy monounsaturated and polyunsaturated fats (45-50%), dietary fiber, and micronutrients including magnesium, phosphorus, vitamin E, and B vitamins. This nutrient density makes peanuts valuable dietary components, though caloric density of approximately 570 calories per 100 grams necessitates portion awareness.
Growing peanuts at home connects cultivation knowledge with nutritional awareness, fostering appreciation for agricultural processes producing staple foods. The relatively compact space requirements and modest input needs position peanuts as viable crops for gardeners seeking productive, unusual additions to traditional vegetable plantings. Success requires attention to specific botanical requirements, particularly soil structure and calcium availability, but rewards careful cultivation with flavorful harvests unavailable through commercial channels.