Growing date trees from seed is a rewarding journey that transforms a simple pit into a majestic palm. This comprehensive guide walks you through germinating date seeds indoors, nurturing young palms in containers, and successfully transitioning them to outdoor landscapes.
Understanding Date Palm Biology and Germination Requirements
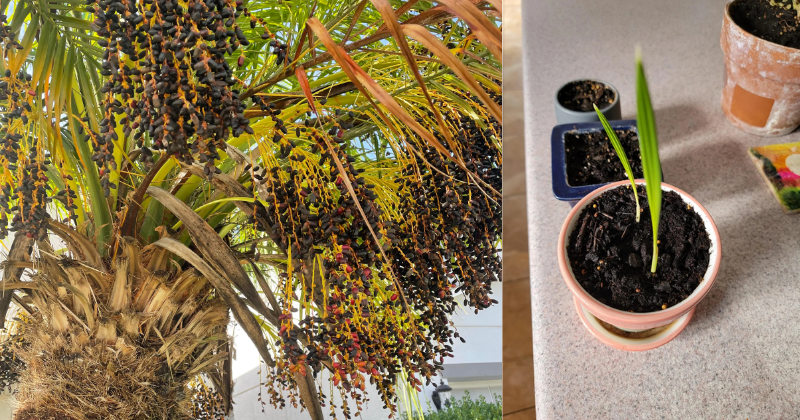
Date palms (Phoenix dactylifera) represent one of humanity’s oldest cultivated fruit trees, with archaeological evidence suggesting domestication over 6,000 years ago in Mesopotamia. These dioecious palms—meaning individual trees are either male or female—produce the sweet fruits we recognize commercially, though seed-grown specimens take 4-8 years to reveal their sex and 7-10 years before fruiting begins.
The seeds themselves possess remarkable longevity. Fresh date pits germinate more reliably than dried ones, though properly stored seeds remain viable for several years. The embryo sits embedded in hard endosperm tissue, protected by a tough seed coat that evolution designed to survive passage through animal digestive systems and harsh desert conditions.
Seed Selection and Preparation
Begin with seeds from fresh, unpasteurized dates—Medjool, Deglet Noor, and Zahidi varieties all germinate readily. Organic dates from Middle Eastern markets often yield better results than commercially processed fruits, which sometimes undergo heat treatments that damage embryo viability.
After removing the seed, rinse away any remaining fruit flesh thoroughly. Some growers notice a slightly fermented smell if fruit residue remains—this organic matter can encourage fungal growth during the germination phase. Pat the clean seeds dry and examine them for integrity. Viable seeds feel solid and heavy, while non-viable ones may appear shriveled or unusually lightweight.
The seed coat requires modification to accelerate germination. In nature, this scarification occurs through weathering, microbial action, and physical abrasion. Home growers replicate this through two methods: mechanical scarification or water soaking. For mechanical treatment, gently rub the seed’s surface with fine sandpaper for 30-60 seconds, creating tiny scratches without damaging the interior. Alternatively, soak seeds in room-temperature water for 24-48 hours, changing the water daily. The seeds absorb moisture and begin swelling—a visible indicator that germination processes have initiated.
Germination Methods: Container Approach
The paper towel method provides excellent germination visualization. Dampen paper towels until moist but not dripping, place 2-4 seeds with space between them, fold the towel over, and seal inside a plastic bag or container. Position this setup in a warm location—ideally 70-75°F (21-24°C). A spot atop the refrigerator or near a water heater works well, though avoid direct heat sources that create temperature fluctuations.
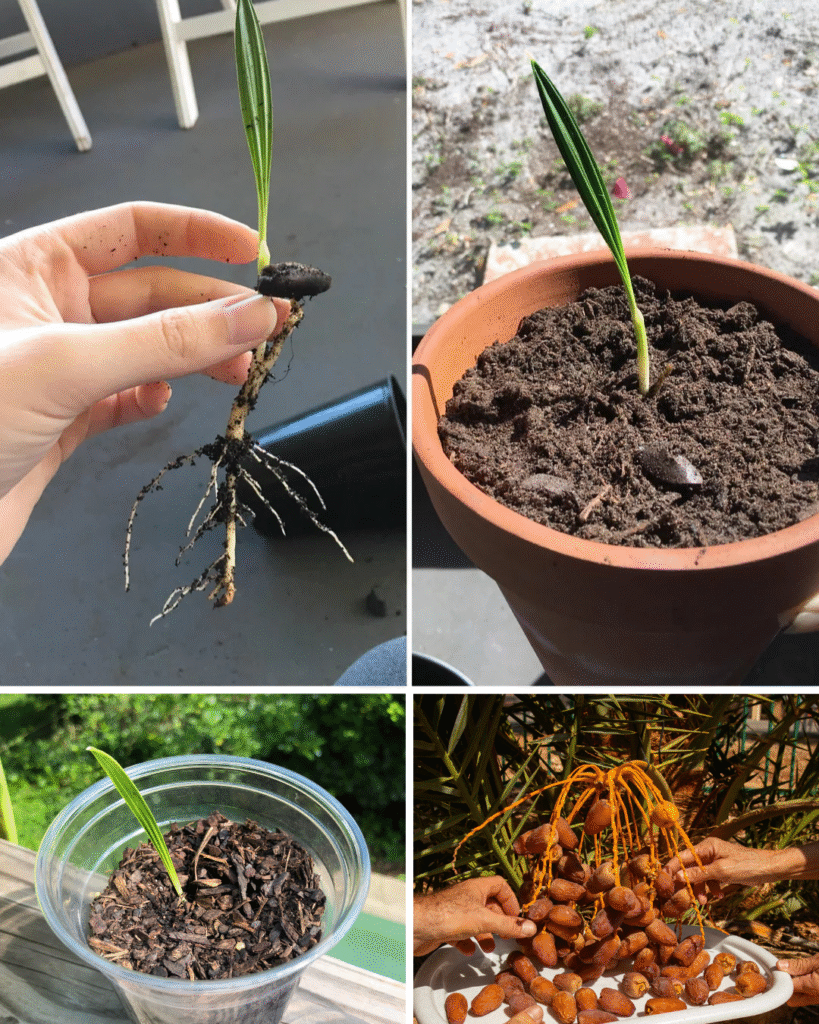
Check moisture levels every 3-4 days. The paper towel should remain consistently damp, resembling a wrung-out sponge. Germination typically occurs within 2-8 weeks, though some seeds take up to 3 months. You’ll observe a white radicle (primary root) emerging first, followed by a shoot. Once the root reaches 1-2 inches, the seedling is ready for potting.
Direct soil germination offers an alternative that eliminates transplant shock. Fill small pots (4-6 inches) with a well-draining mix—equal parts potting soil, perlite, and coarse sand creates ideal structure. Plant seeds vertically with the narrower end facing upward, buried about 1 inch deep. Water thoroughly and maintain consistent soil moisture. This method takes slightly longer to show results since the germination occurs out of sight, but seedlings establish more robust root systems from the start.
Initial Potting and Substrate Composition
When transferring germinated seeds or establishing direct-sown palms, substrate composition critically influences early development. Date palms evolved in alluvial desert soils—sandy, well-draining substrates with minimal organic content. Replicating these conditions prevents the root rot that kills more container palms than any other factor.
A functional mix combines 40% quality potting soil, 30% coarse sand (not fine beach sand, which compacts), 20% perlite, and 10% composted bark. This ratio ensures adequate drainage while retaining sufficient moisture and nutrients. Some growers incorporate a tablespoon of bone meal per gallon of mix, providing slow-release phosphorus that supports root development.
Container selection matters more than many assume. Terracotta pots offer excellent breathability, allowing excess moisture to evaporate through the porous clay, though they require more frequent watering. Plastic containers retain moisture longer but need exceptional drainage—drill additional holes if necessary. Size appropriately: 6-8 inch pots accommodate seedlings for the first year, with transplanting to larger containers as the root system expands.
Environmental Conditions for Container Growth
Young date palms thrive in bright, indirect light initially. Place containers near south or west-facing windows where they receive 6-8 hours of filtered sunlight. Seedlings adapted to germination’s dimness need gradual light exposure—sudden intense sun causes leaf burn, visible as brown, papery tips.
Temperature consistency accelerates growth. Ideal ranges sit between 65-85°F (18-29°C) during the day, with nighttime temperatures no lower than 60°F (15°C). Date palms tolerate brief cold exposure once established, but young seedlings suffer cellular damage below 50°F (10°C). If growing in variable climates, bring containers indoors during cold snaps or position them in protected microclimates like covered patios.
Humidity requirements remain moderate. While date palms originate from arid regions, container-grown specimens benefit from 40-50% relative humidity, preventing excessive transpiration stress. Occasional misting helps, though avoid creating persistently wet foliage that invites fungal issues. If you notice the developing fronds look slightly wrinkled or growth slows dramatically, low humidity may be limiting photosynthetic efficiency.
Watering Protocols and Moisture Management
Date palms evolved sophisticated drought adaptations, including deep root systems that access groundwater and thick fronds that minimize water loss. Container cultivation, however, constrains these mechanisms, requiring attentive moisture management that avoids both extremes—waterlogged soils and complete desiccation.
Water when the top 2-3 inches of substrate feel dry to touch. Insert your finger into the soil; if it feels cool and slightly moist at depth, wait another day or two. When watering, apply thoroughly until liquid drains from the bottom holes, ensuring the entire root zone receives moisture. Shallow watering encourages roots to concentrate near the surface, creating vulnerability during any moisture stress.
Seasonal adjustments matter significantly. Active growth periods in spring and summer increase water demand—you might water every 4-7 days depending on temperature, humidity, and container size. Winter dormancy reduces requirements dramatically; monthly watering often suffices when growth essentially pauses. Overwatering during dormancy causes root suffocation as the plant’s reduced metabolic activity cannot process excess moisture.
Water quality influences long-term health. Date palms tolerate moderate salinity—a trait that allowed their cultivation in marginal agricultural lands—but chlorinated tap water sometimes causes tip burn. Letting water sit overnight allows chlorine to dissipate, or use collected rainwater when available. If your water is particularly hard (high mineral content), you might notice white crusty deposits on the soil surface; periodic flushing with extra water helps leach these salts.
Fertilization Strategy for Container Palms
Container growing depletes available nutrients faster than ground cultivation, where roots access vast soil volumes. A balanced fertilization program supports vigorous growth without encouraging the soft, disease-prone tissue that results from excessive nitrogen.
Begin fertilizing 2-3 months after germination, once the seedling establishes 2-3 fronds. Use a balanced palm fertilizer with micronutrients (look for formulations labeled 8-4-12 or similar with added magnesium, manganese, and iron). These ratios reflect palms’ specific nutritional needs—moderate nitrogen for foliage, lower phosphorus since palms require less than many plants, and higher potassium for structural integrity and stress resistance.
Application frequency follows the growing season. During active growth (spring through early fall), fertilize monthly at half the recommended strength—this « weak weekly » approach (modified to monthly for convenience) provides steady nutrition without overwhelming young roots. Suspend fertilization in late fall and winter when growth halts. Granular slow-release fertilizers offer convenience, releasing nutrients gradually over 3-4 months, though liquid applications allow more precise control.
Magnesium deficiency manifests commonly in container palms, appearing as yellowing bands on older fronds while newer growth remains green. If you observe this pattern, supplement with Epsom salts (magnesium sulfate)—dissolve 1 tablespoon per gallon of water and apply as you would regular fertilizer. Manganese deficiency creates similar symptoms but affects newer fronds, requiring a chelated manganese supplement.
Developmental Stages and Growth Expectations
Date palm seedlings progress through distinct phases, each with characteristic appearance and growth rates. Understanding these stages helps set realistic expectations and identify potential problems.
The first year focuses on root establishment rather than dramatic foliage expansion. Initial growth produces slender, grass-like leaves—not the compound pinnate fronds associated with mature palms. This juvenile foliage photosynthesizes adequately while requiring less structural support, allowing the plant to invest resources in underground development. Growth appears slow, adding perhaps 2-4 simple leaves over 12 months.
Year two marks a transition. The seedling begins producing divided fronds with 2-4 leaflets, signaling increased vigor. Root systems now extend throughout the container, necessitating transplanting to larger pots (10-12 inches). Growth accelerates noticeably if conditions remain optimal.
By year three, the palm produces recognizably compound fronds with 6-10+ leaflets, and the trunk begins developing—though initially, it remains hidden beneath the substrate or appears as modest swelling at the crown. Some growers become concerned when they don’t observe a visible trunk, not realizing palms initially invest in girth rather than height. The woody trunk tissue develops gradually, with noticeable elongation typically beginning in years 4-5.
Transplanting and Container Size Progression
Root-bound palms exhibit slowed growth, yellowing foliage, and rapid soil drying despite adequate watering. When roots circle densely around the pot’s perimeter or emerge from drainage holes, transplanting becomes necessary—typically every 12-18 months for young, vigorous specimens.
Timing transplanting for early spring optimizes recovery, allowing the growing season for root establishment. Water the palm thoroughly the day before to ensure the root ball holds together during removal. Gently tap the container’s sides and bottom to loosen the root mass, then invert while supporting the crown. If roots resist, run a knife around the pot’s interior edge.
Examine the removed root ball. Healthy roots appear white to tan, firm, and spread throughout the medium. If you encounter mushy, brown, or foul-smelling roots, trim away affected portions with sterilized shears—this indicates past overwatering episodes. Tease apart the outer roots gently if they’re densely matted, encouraging outward growth into fresh substrate.
Select containers 2-4 inches larger in diameter than the previous one. Place fresh substrate in the bottom, position the palm at the same depth it previously grew (planting too deeply suffocates the crown), and fill around the root ball with prepared mix. Water thoroughly to settle the medium and eliminate air pockets. Expect a brief adjustment period where new growth slows—this is normal as roots expand into the new space.
Transitioning to Outdoor Conditions
Moving container palms outdoors permanently requires gradual acclimation—a process called hardening off that prevents shock from sudden environmental changes. This transition typically occurs when palms reach 2-3 feet tall and demonstrate robust health, usually by year 3-4.
Begin hardening off in spring after frost danger passes. Place containers in a shaded outdoor location for 2-3 hours daily, gradually increasing exposure over 2-3 weeks. Monitor for stress indicators: wilting, leaf bleaching, or brown patches. If these appear, reduce exposure duration. After the initial shade period, introduce direct morning sun for 1-2 hours, adding an hour every few days until the palm tolerates 6+ hours of full sun.
Wind presents another adaptation challenge. Indoor plants lack the structural reinforcement that develops from constant air movement. Strong winds can shred tender fronds on newly transitioned palms. Position containers in wind-protected areas initially, allowing several weeks of gradual exposure. You might notice the trunk and leaf bases thickening as mechanical stress stimulates strengthening responses.
Temperature fluctuations require consideration. While established date palms survive brief freezes to 20°F (-6°C), young container specimens need protection below 35°F (2°C). Monitor weather forecasts during the transition period, moving containers to protected areas or indoors during cold snaps. This gradual exposure builds cold tolerance, allowing eventual outdoor overwintering in appropriate climates.
Site Selection for Permanent Planting
Choosing the correct planting site determines long-term success. Date palms require full sun—minimum 8 hours daily—for optimal growth and eventual fruiting. Shaded locations produce weak, elongated growth and eliminate any fruit production possibility.
Soil drainage ranks as the critical site characteristic. Date palms tolerate various soil types—from sandy loams to heavy clays—provided water doesn’t accumulate around roots. Test drainage by digging a hole 12 inches deep, filling it with water, and observing how quickly it empties. Complete drainage within 12 hours indicates adequate percolation. Sites where water remains after 24 hours require amendment or alternative location selection.
Spacing matters significantly. Mature date palms reach 40-60 feet tall with fronds spanning 20+ feet, though this takes decades. For landscape purposes, allow 15-20 feet from structures, power lines, and other trees. While this seems excessive for a 3-foot container specimen, palms prove nearly impossible to transplant successfully once established—planning for mature size prevents future conflicts.
Microclimate considerations influence cold hardiness. Planting on the south side of buildings, near masonry walls that absorb and radiate heat, or in protected courtyards can provide several degrees of temperature buffering. These zones may make outdoor cultivation viable in borderline climates (USDA zones 8b-9a) where open-field planting would fail.
Ground Planting Procedures
Optimal planting timing aligns with spring warming, when soil temperatures reach 65°F (18°C) and root growth activates. Fall planting works in mild climates but risks cold damage before establishment occurs.
Excavate a hole twice the width but equal depth to the container. Date palms develop vertical root systems with a prominent taproot; deep planting holes prove unnecessary and sometimes detrimental if they collect water. Rough up the hole’s sides to prevent glazing—smooth walls created by shovel blades can impede root penetration in clay soils.
Prepare the planting medium if native soil presents challenges. Mix excavated soil with compost (25% by volume) and coarse sand (25%) if drainage seems questionable. Avoid excessive organic matter, which settles differently than mineral soil and creates a « pot effect » where water accumulates in the amended zone.
Remove the palm from its container following the techniques described for transplanting. Position it in the hole with the crown slightly above the surrounding grade—planting 1-2 inches high accounts for settling and ensures the crown doesn’t end up below grade where moisture accumulates. Backfill halfway, water thoroughly to eliminate voids, then complete filling.
Create a water basin by forming a soil berm in a circle 2-3 feet from the trunk. This temporary structure (remove after 6 months) directs irrigation to the root zone rather than running off. Apply 2-3 inches of mulch outside the basin, keeping it 6 inches away from the trunk to prevent crown rot. Wood chips, bark, or shredded leaves work well, moderating soil temperature and moisture while suppressing weeds.
Post-Planting Care and Establishment
Newly transplanted palms require consistent moisture while establishing—typically 18-24 months for root systems to extend into surrounding soil. Water deeply 2-3 times weekly during the first growing season, adjusting for rainfall and temperature. Deep, infrequent watering encourages deep rooting, while frequent shallow watering creates surface-dependent root systems vulnerable to stress.
Monitor new growth as an establishment indicator. Palms should produce 1-2 new fronds during the first growing season after planting, gradually accelerating to 8-12 fronds annually once established. Lack of new growth or frond yellowing suggests problems: inadequate water, planting too deep, root damage during transplanting, or soil issues.
Fertilization begins 3-4 months after planting, once new roots venture into native soil. Apply palm-specific fertilizer in a circle 2-3 feet from the trunk (where feeder roots concentrate), following label rates. Increase application amounts annually as the palm enlarges, eventually settling on 1-2 pounds of granular fertilizer per 100 square feet of canopy area, applied quarterly during the growing season.
Staking rarely proves necessary for date palms—their naturally stout trunks and deep root systems provide adequate stability once established. If windy conditions cause excessive movement that disturbs newly forming roots, install temporary stakes on two sides using flexible ties that allow some trunk flex. Remove supports after 6-12 months to avoid creating artificial dependency.
Common Challenges and Solutions
Yellowing fronds suggest several possible causes. Lower, older fronds naturally yellow and die as new growth emerges—this represents normal senescence. If yellowing affects multiple fronds across the canopy, investigate nutrition (particularly nitrogen or magnesium deficiency), water stress (both over and under-watering cause yellowing, though patterns differ), or root problems.
Brown leaf tips result from salt accumulation, low humidity, underwatering, or inconsistent moisture. Date palms tolerate salinity better than many species, but container growing concentrates salts over time. Leach pots periodically by applying 2-3 times the container volume in water, allowing it to drain freely. Trim brown tips with sharp shears at an angle that mimics the natural leaf shape—cutting straight across creates more visible damage.
Fungal issues occasionally affect seedlings in overly moist conditions. Damping off—where seedlings collapse at soil level—indicates Pythium or Rhizoctonia infection. Prevention through proper watering and air circulation proves more effective than treatment. If established palms develop leaf spots (circular brown or black lesions), improve air circulation and avoid overhead watering. Most leaf spot fungi spread via water splash and thrive in persistently wet conditions.
Scale insects and spider mites occasionally infest container palms. Scale appears as brown, immobile bumps on fronds and stems, while spider mites create fine webbing and stippled, yellowing leaves. Insecticidal soap or horticultural oil controls both pests when applied thoroughly to frond undersides. Multiple applications 7-10 days apart interrupt pest reproduction cycles.
Climate Considerations and Cold Protection
Date palms evolved in hot, arid climates—North Africa, the Middle East, and the Persian Gulf—experiencing minimal winter cold. While mature specimens tolerate brief freezes to 15-20°F (-9 to -6°C), young palms and prolonged cold prove more challenging.
USDA hardiness zones 9-11 support outdoor date palm cultivation without protection. Zone 8 represents borderline territory where microclimates and cold protection extend viability. Zones 7 and colder require either permanent container culture with winter indoor housing or abandoning date palms for hardier Phoenix species like Canary Island date palm (P. canariensis).
Cold protection strategies begin with site selection—south-facing walls, urban heat islands, and protected courtyards moderate temperature extremes. When frost threatens, irrigate deeply beforehand; moist soil retains and radiates more heat than dry soil. Cover small palms with frost blankets or burlap supported by stakes to avoid foliage contact. String old-fashioned incandescent holiday lights through the fronds—the heat they generate (unlike LEDs) provides surprising protection for a few degrees of buffering.
Freeze damage appears gradually. Affected fronds turn brown and eventually desiccate completely. Resist pruning immediately after cold events—damaged fronds still photosynthesize somewhat and provide protection if additional freezes occur. Wait until new growth emerges in spring, then remove dead foliage. The growing point (apical meristem) determines palm survival; if this crown tissue remains green and firm, the palm recovers regardless of frond damage.
Long-Term Growth and Fruiting Expectations
Seed-grown date palms require patience. While tissue-cultured commercial specimens begin fruiting in 4-5 years, seedlings typically need 7-10 years before flowering—and then only if the tree is female and a male pollinator grows nearby. Date palms require manual or wind pollination; a single male palm can pollinate dozens of females if you collect pollen and apply it to female flowers.
Sexual determination remains unknown until flowering. Roughly 50% of seedlings are male, though this ratio varies. Male flowers produce abundant pollen in dense clusters but no fruit. Female flowers develop into dates if pollinated. Some growers plant several seedlings to increase odds of obtaining both sexes, grafting desired varieties onto established seedling rootstocks later.
Trunk development proceeds slowly but steadily. Young palms allocate resources to trunk girth before height, creating stout lower trunks that support eventual frond loads. Height increases accelerate after establishment, with mature palms adding 12-24 inches annually depending on growing conditions.
Fruit quality from seedling palms varies unpredictably. Date palm genetics don’t reliably pass traits to seedlings—a seed from an exceptional Medjool date might produce inferior fruit or something unexpectedly good. Commercial cultivation uses offshoots (pups) or tissue culture to replicate superior varieties exactly. Seedling cultivation suits those interested in landscape palms, experimentation, or developing new varieties, rather than consistent fruit production.
Maintenance Practices for Established Palms
Mature date palms require minimal maintenance compared to many landscape plants. Dead fronds naturally persist on the trunk, creating the characteristic « skirt » visible on unmanaged palms. These dry fronds harbor rodents, scorpions, and create fire hazards in some regions, prompting removal—though ecologically, they provide wildlife habitat and moderate trunk temperature.
Prune dead fronds when they droop below horizontal, cutting close to the trunk without damaging the boot (leaf base). Avoid removing fronds still green or angled upward—palms need their full complement of functional leaves for optimal photosynthesis. Over-pruning (called « hurricane cutting » or « pencil pointing ») stresses palms, slows growth, and reduces vigor.
Fertilization continues throughout the palm’s life. Established specimens receive 1-2 pounds of complete palm fertilizer per 100 square feet of canopy area, divided into 3-4 applications during the growing season. Scatter fertilizer in a band starting 3-4 feet from the trunk and extending to the canopy’s drip line, where feeder roots concentrate.
Irrigation requirements decrease as roots penetrate deeply, accessing moisture unavailable to shallow-rooted plants. In regions with seasonal rainfall patterns, supplemental irrigation during dry periods maintains growth. Desert climates require continued irrigation throughout the palm’s life, though established specimens need far less frequent watering than during establishment.
Alternative Species and Related Palms
Several Phoenix species offer similar ornamental value with varying climate adaptations. Canary Island date palm (Phoenix canariensis) tolerates more cold and humidity than true date palm, thriving in USDA zones 8-11. It produces small, inedible fruits but creates a more massive trunk and denser crown, making it popular for landscaping.
Pygmy date palm (Phoenix roebelenii) suits small spaces and container culture permanently. Reaching only 8-10 feet tall, it tolerates shade better than larger relatives and functions well indoors with adequate light. Seeds germinate using identical methods, though it tolerates less cold (zones 10-11).
Senegal date palm (Phoenix reclinata) develops multiple trunks, creating a clumping habit rather than single-trunked growth. It tolerates wetter soils than P. dactylifera and thrives in zones 9-11. The fruits are edible but smaller and less sweet than dates.
Sustainable Practices and Resource Management
Date palm cultivation aligns well with water-conscious landscaping once established. While young palms require consistent moisture, mature specimens survive extended drought periods—a trait that made them agricultural staples in water-scarce regions. Pairing date palms with similarly drought-adapted plants (California natives, Mediterranean species, succulents) creates cohesive, low-water landscapes.
Compost kitchen scraps and yard waste to create fertilizer amendments, reducing synthetic fertilizer dependence. Date palms respond well to compost top-dressing, and the organic matter improves soil structure in heavy clays or sandy soils. Apply 1-2 inches of finished compost around the root zone annually.
Harvest rainwater where feasible, using collection systems to irrigate palms during dry seasons. Date palms tolerate stored rainwater’s variable mineral content well, and rain collection reduces municipal water consumption.
Pruned fronds create abundant biomass. Chop them into 6-12 inch segments and use as pathway mulch, add to compost piles, or allow decomposition in place around the palm (provided fire codes permit). The tough fiber decomposes slowly, providing long-lasting organic matter.
Growing date palms from seed connects us to humanity’s agricultural heritage while creating living structures that endure for decades. The process requires patience, attention to fundamental cultural needs, and appreciation for these remarkable palms’ natural resilience. Whether your goal involves eventual fruit production, creating tropical landscape aesthetics, or simply the satisfaction of nurturing a seed into a majestic tree, the journey offers rewards at every stage.