Building a simple egg incubator from a water bottle is an accessible DIY project that demonstrates the fundamental principles of artificial incubation while providing a functional solution for hatching small eggs like quail or finch.
Understanding the Basic Requirements for Egg Incubation
Successful egg incubation requires maintaining three critical environmental parameters: temperature, humidity, and ventilation. For most small bird eggs, the optimal temperature range sits between 37.5°C and 38.5°C (99.5°F to 101.3°F), while relative humidity should remain around 50-55% during the first two-thirds of incubation, increasing to 65-70% during the final days before hatching. These conditions mimic what a brooding parent provides naturally.
The water bottle incubator works by creating a miniature greenhouse environment where heat retention and moisture control become manageable through simple materials. While this method won’t match the precision of commercial incubators, it demonstrates remarkable effectiveness for educational purposes or emergency situations where purchased equipment isn’t available.
Materials Required for Construction
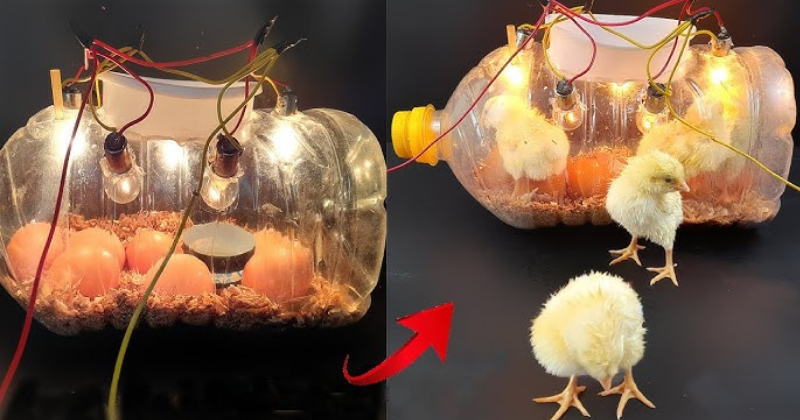
You’ll need a clean 5-liter plastic water bottle with the label removed, which serves as your primary incubation chamber. The transparency allows for easy observation without disturbing the internal environment. Additional materials include a small incandescent light bulb (15-25 watts works well), a socket with cord, a thermometer capable of reading between 35-40°C, a small container for water to maintain humidity, clean cloth or paper towels for bedding, and adhesive tape or hot glue for assembly.
The choice of light bulb matters significantly. Incandescent bulbs generate heat as a byproduct of light production, making them ideal for this application. LED bulbs, while energy-efficient, produce minimal heat and won’t maintain adequate temperature. Some builders also incorporate a dimmer switch to fine-tune heat output, though this adds complexity to an otherwise straightforward design.
Step-by-Step Construction Process
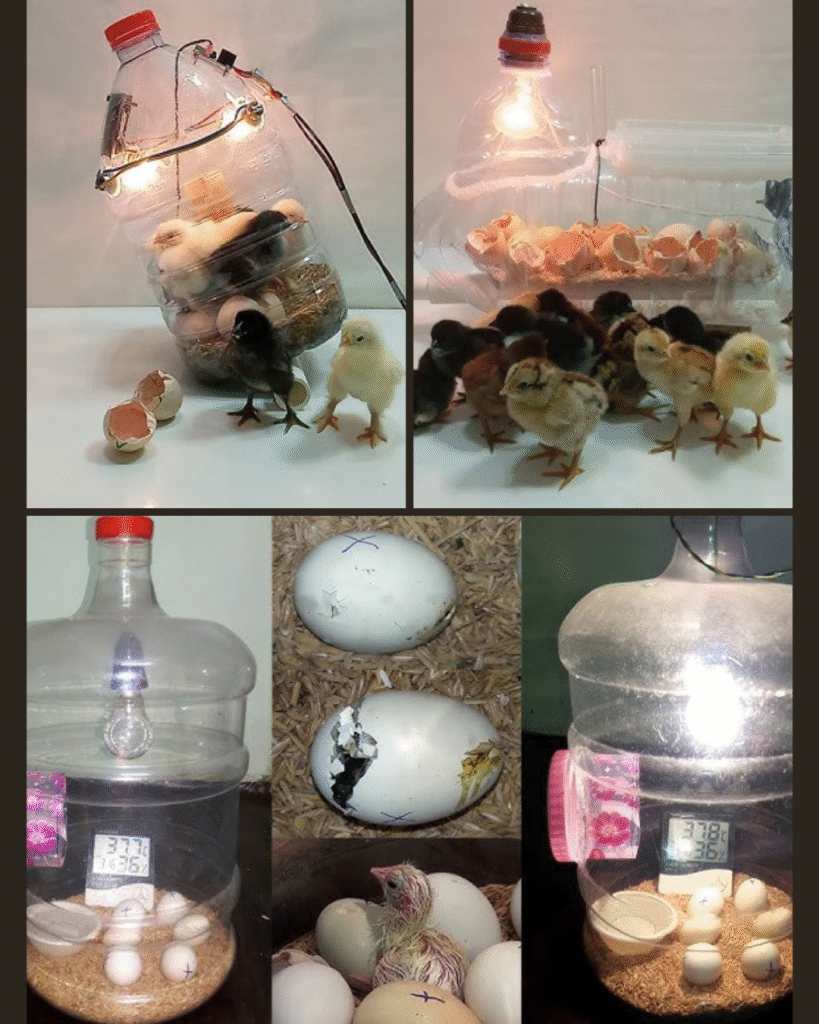
Begin by cutting the water bottle horizontally about one-third from the bottom. This lower section becomes your base chamber where the heating element and humidity source reside. The upper section, when inverted, creates a dome that retains heat while allowing some air exchange. Cut a small opening in the bottle cap—approximately 2-3 centimeters in diameter—to accommodate the light bulb socket.
Secure the light socket through this opening using waterproof adhesive or hot glue, ensuring the bulb hangs down into the chamber without touching the sides. The bulb should be positioned so it sits roughly in the center of the space when the bottle is assembled. Place your small water container in the bottom section, filling it about halfway. This provides the humidity source through natural evaporation.
Create a platform for the eggs using a small wire mesh or perforated plastic sheet, suspended about 5-7 centimeters above the water container. This elevation prevents direct heat exposure while allowing warm air circulation around the eggs. The eggs should never sit directly on a solid surface or in water. Line this platform with clean, slightly damp cloth to provide cushioning and additional moisture retention.
Temperature Regulation and Monitoring
Insert your thermometer through a small hole cut in the bottle’s side, positioning it at egg level rather than near the heat source or at the top of the chamber. Temperature readings at egg height provide accurate environmental data. Before introducing any eggs, run the incubator for 24 hours to establish stable conditions and identify necessary adjustments.
Temperature control represents the most challenging aspect of this design. If readings exceed 39°C, try a lower wattage bulb, increase ventilation by creating small additional holes, or raise the bulb slightly higher in the chamber. If temperature drops below 37°C, reduce ventilation openings, lower the bulb position, or use a slightly higher wattage. Some builders wrap the exterior in insulating material like bubble wrap or foam sheets to improve heat retention, though this reduces visibility.
Room temperature significantly affects incubator performance. Operating in a space maintained around 20-22°C provides better stability than colder environments where the small bulb struggles to maintain adequate warmth. Drafts from windows, doors, or air conditioning vents can create temperature fluctuations that compromise hatching success.
Humidity Management Techniques
Maintaining proper humidity without sophisticated equipment requires attention to water level and air exchange. The water container should never run dry, as humidity drops rapidly in the small chamber volume. Check water levels twice daily, refilling with room-temperature water to avoid temperature shocks. Using a small sponge in the water container increases surface area for evaporation, enhancing humidity generation.
During the first phase of incubation, aim for humidity that keeps the cloth bedding feeling slightly damp but not wet. As hatching approaches, increase humidity by adding a second small water container or placing a damp sponge inside the chamber. Excessive humidity appears as heavy condensation coating all interior surfaces, while insufficient humidity leaves the chamber looking completely dry with no visible moisture on surfaces.
A simple humidity indicator involves observing the air cell—the empty space at the egg’s rounded end that becomes visible when candling. This cell should gradually enlarge as incubation progresses, with proper humidity allowing steady but not excessive water loss from the egg. Too much humidity results in an undersized air cell, while too little creates an oversized cell and thick, rubbery inner membranes that chicks struggle to break through.
Ventilation and Air Quality
While heat and humidity retention are important, fresh air exchange prevents carbon dioxide buildup and provides oxygen for developing embryos. Create 4-6 small ventilation holes around the bottle’s midsection, each about 3-4 millimeters in diameter. These holes allow stale air to escape while maintaining the greenhouse effect necessary for temperature stability.
Positioning matters for ventilation holes. Placing them slightly above egg level creates natural convection currents where warm, moist air rises toward the top opening while cooler fresh air enters through side holes. This passive circulation system works continuously without mechanical intervention. Avoid creating large openings that cause rapid heat loss or drafts that create cold spots within the chamber.
Egg Turning and Positioning
Natural incubation involves parents rotating eggs multiple times daily to prevent the developing embryo from adhering to inner membranes and to ensure even heat distribution. In your water bottle incubator, manually turn eggs at least three times daily—morning, midday, and evening provides a reasonable schedule. Turn eggs gently through approximately 180 degrees, marking one side with a soft pencil to track rotation.
Egg positioning follows specific guidelines. Place eggs on their sides rather than standing upright, as this orientation allows the embryo to develop in its natural position relative to the air cell. Avoid turning eggs during the final three days before expected hatching, as chicks need stability while positioning themselves for emergence. Most small bird eggs require 14-21 days for incubation, depending on species, with quail typically hatching around day 17-18.
Candling and Development Monitoring
Candling—illuminating eggs with a bright light in a dark room—reveals internal development without opening the incubator unnecessarily. After 5-7 days of incubation, viable eggs show visible blood vessels forming a spider-web pattern around a darker central area where the embryo develops. Infertile eggs remain uniformly clear or show only the yolk shadow without vascular development.
Perform candling quickly to minimize temperature loss, examining each egg for only 20-30 seconds. As development progresses, the embryo grows larger and darker, eventually filling most of the egg interior except for the air cell. By day 14 in quail eggs, the contents appear nearly opaque with only the air cell clearly visible. Movement within the egg sometimes becomes apparent in final days, confirming life and active preparation for hatching.
Remove any eggs that show no development, develop unusual odors, or contain blood rings—a circular pattern of blood vessels that indicates early embryonic death. These eggs won’t hatch and can contaminate the incubation environment if they deteriorate internally.
Hatching Process and Assistance
As hatching approaches, chicks internally pip—breaking through the inner membrane into the air cell—before externally pipping through the shell. You might hear faint cheeping sounds from inside eggs a day or two before external pipping occurs. Once external pipping begins, chicks typically complete hatching within 12-24 hours, though some take longer without problems occurring.
Resist the urge to help chicks emerge unless clear signs of distress appear after 36 hours of external pipping with no progress. Premature assistance risks severe hemorrhaging from blood vessels still attached to shell membranes. The hatching process naturally allows these vessels to dry and detach safely. If intervention becomes necessary, work slowly, moistening membranes with warm water and only removing shell from areas where membranes appear completely dry and whitish.
Newly hatched chicks require time to dry and fluff before transfer to a brooder setup. Leave them in the incubator for 6-12 hours after hatching, allowing them to regain strength while maintaining the warm, humid environment. The increased humidity from hatching fluid benefits any remaining eggs still in the process of emerging.
Troubleshooting Common Issues
Temperature instability often stems from inadequate insulation or excessive ventilation. Wrapping the bottle exterior with insulating material while maintaining visibility through one clear section balances heat retention with monitoring capability. Ambient temperature fluctuations between day and night can create challenges; operating the incubator in a climate-controlled room provides more consistent results than locations experiencing temperature swings.
Low hatch rates despite proper temperature and humidity might indicate problems with egg fertility, storage conditions before incubation, or excessive handling. Eggs stored longer than 10 days before incubation show progressively declining viability. Storage temperature matters too—room temperature around 15-18°C preserves viability better than refrigeration or exposure to heat. Turn stored eggs daily until beginning incubation to prevent yolk from settling against membranes.
Chicks dying fully formed within eggs suggest problems during the final hatching stage, often related to incorrect humidity during the last days. Insufficient humidity creates tough, dried membranes that chicks cannot break through, while excessive humidity can prevent proper air cell formation, leaving chicks unable to achieve internal pipping successfully.
Limitations and Realistic Expectations
This simple incubator design works best for small eggs from quail, finches, or similar-sized birds. Larger eggs like chicken eggs require more substantial heating capacity and greater spatial volume than a water bottle provides. Success rates typically range from 40-60% for first-time builders, improving with experience and careful attention to environmental parameters.
Commercial incubators offer automated turning mechanisms, precise electronic temperature control, and forced-air circulation that this design cannot replicate. However, the educational value and satisfaction of successful hatching using basic materials provides unique rewards beyond the merely practical considerations of efficiency and convenience.
Understanding that some eggs won’t hatch regardless of perfect conditions helps maintain realistic expectations. Even professional hatcheries using sophisticated equipment rarely achieve 100% hatch rates. Natural variation in egg fertility, genetic factors, and the inherent challenges of artificial incubation mean that some losses occur despite conscientious care.
Safety and Hygiene Considerations
Electrical safety requires attention when combining water sources with heating elements. Ensure all connections remain secure and positioned where water cannot accidentally splash onto electrical components. Using a ground-fault circuit interrupter (GFCI) outlet provides additional protection against electrical hazards. Never leave the incubator unattended for extended periods without ensuring fire safety—the light bulb generates sufficient heat to pose risks if insulation materials contact it directly or if flammable materials accumulate nearby.
Hygiene practices prevent bacterial or fungal contamination that compromises hatching success. Wash hands before handling eggs, clean all materials with mild disinfectant solution before assembly, and replace water and bedding materials if they develop odors or visible contamination. Remove any eggs that crack during incubation immediately, as their contents can leak and create unsanitary conditions.
This water bottle incubator represents an intersection of practical resourcefulness and biological education, demonstrating that complex natural processes can sometimes be successfully replicated through simple means and careful observation. The unpredictability inherent in the design teaches valuable lessons about environmental management, patience, and the remarkable resilience of life when basic requirements are met with consistency and care.