Cardboard mulching is an effective, biodegradable method for suppressing weeds, improving soil structure, and preparing garden beds. Applied correctly at the right time, cardboard creates a barrier that blocks light while eventually decomposing into organic matter. This technique works best in fall or early spring, requires proper soil preparation, and demands attention to material selection and layering depth.
Understanding Cardboard as a Garden Material
Cardboard functions as both a physical barrier and a slow-release carbon source. The cellulose fibers create an anaerobic environment beneath the surface, effectively smothering existing vegetation while the material gradually breaks down over six to eighteen months. Plain corrugated cardboard without glossy coatings or colored inks contains lignin and cellulose that soil microorganisms can metabolize into humus.
The effectiveness depends on cardboard thickness and environmental conditions. Single-layer applications in dry climates may deteriorate too quickly, while excessive layering in wet regions can create water-repellent zones that prevent moisture penetration to root systems. Most gardeners find that two to three overlapping layers of standard shipping box cardboard provides optimal results.
Optimal Timing for Cardboard Application
Fall represents the ideal season for cardboard mulching in most climates. Applied in September through November, cardboard has sufficient time to decompose partially before spring planting. The material traps autumn moisture, and winter freeze-thaw cycles accelerate breakdown while earthworms remain active in moderate temperatures.
Early spring application works for areas requiring immediate weed suppression, though decomposition proceeds more slowly in cool soil. Summer installation is possible but problematic—dry cardboard can wick moisture away from plant roots, and the material may not conform well to hard, compacted ground. Some gardeners soak cardboard sheets before summer application to improve contact with soil.
For new garden beds, applying cardboard six to twelve months before intended planting allows complete breakdown of existing vegetation. The decomposing grass and weed roots beneath the cardboard create nutrient-rich soil. Perennial weeds with deep taproots may require longer suppression periods or additional intervention.
Material Selection and Preparation
Not all cardboard suits garden use. Plain brown corrugated boxes from shipments provide the best material—avoid cardboard with plastic tape, which should be removed, though small staples typically decompose or work into soil harmlessly. Waxed cardboard from produce boxes resists decomposition and should not be used. Pizza boxes contaminated with food oils attract pests and create anaerobic pockets.
Printed cardboard requires scrutiny. Modern soy-based inks are generally safe, but glossy magazine-style printing may contain heavy metals or synthetic compounds. When uncertain, stick to plain brown material. The occasional shipping label won’t significantly impact a large garden area, though removing obvious synthetic stickers is prudent.
Cardboard should be flattened completely before application. Boxes with air pockets create uneven surfaces and decompose irregularly. Some gardeners briefly wet cardboard sheets to make them more pliable and easier to shape around existing plants or garden edges, though excessively soggy material becomes difficult to position.
Soil Preparation Before Cardboard Placement
The soil surface requires specific preparation for cardboard to function effectively. Mow or cut existing vegetation as close to ground level as possible—tall grass or weeds create air gaps beneath cardboard that delay decomposition and allow persistent growth. Remove any woody stems or thick roots that might puncture the cardboard layer.
Water the area thoroughly one to two days before cardboard application. Moist soil facilitates decomposition and ensures earthworms and beneficial microorganisms remain active beneath the barrier. Dry soil creates a hostile environment that slows biological processes essential for breaking down both cardboard and underlying vegetation.
Adding a thin layer of compost or aged manure directly on soil before cardboard placement accelerates decomposition. This nitrogen-rich layer feeds microorganisms that break down carbon-heavy cardboard. The practice is particularly valuable in nutrient-poor soils or when rapid decomposition is desired for spring planting.
Proper Layering Technique
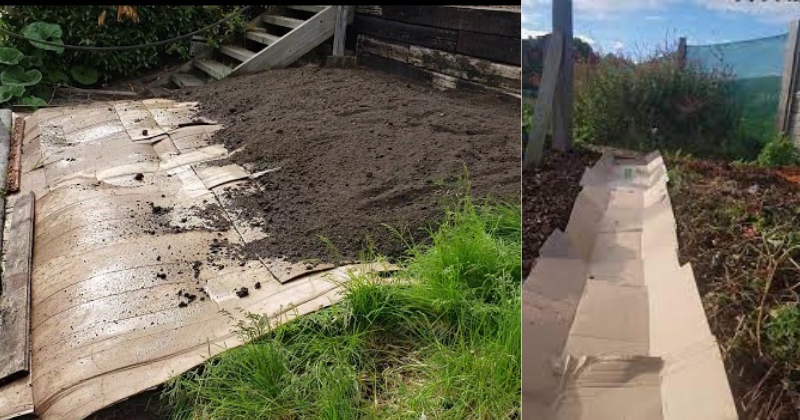
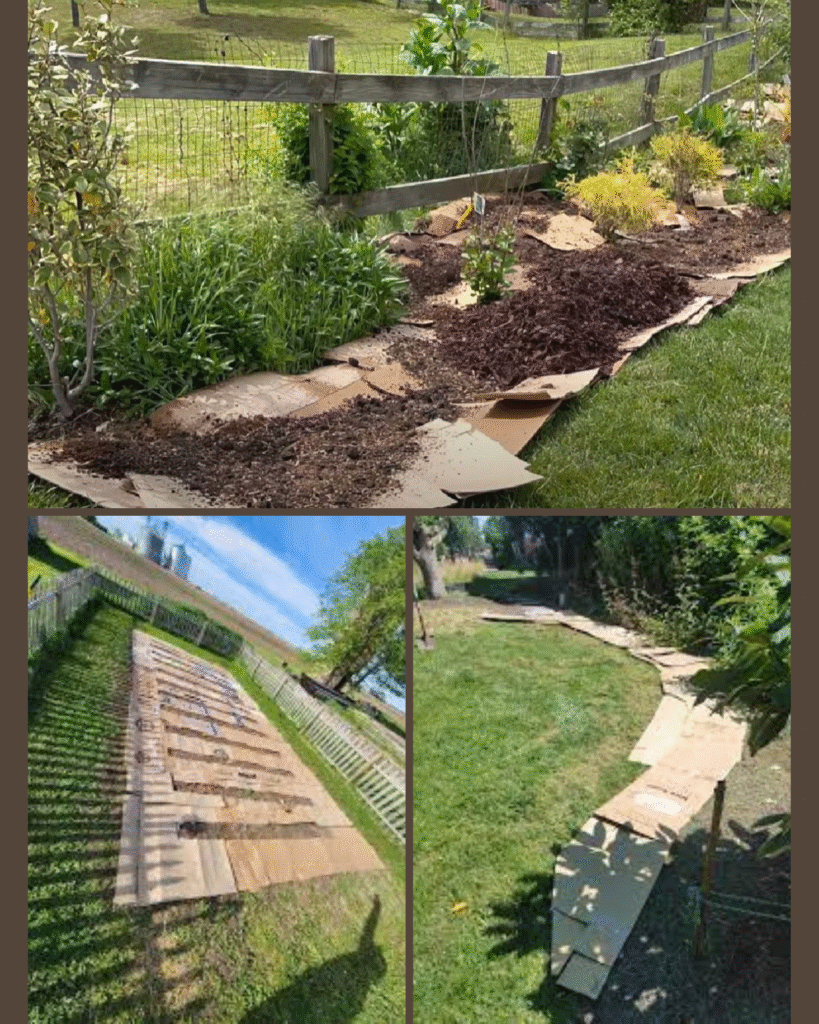
Begin cardboard placement at one edge of the prepared area, working systematically across the space. Overlap sheets by at least six to eight inches—gaps allow light penetration and weed emergence. Pay particular attention to edges and corners where wind might lift cardboard before it settles.
For existing garden beds with established plants, cut cardboard to fit around stems, leaving a three to four inch gap around plant bases. Tight contact with stems can trap moisture and encourage fungal growth or create habitat for slugs. The gap allows air circulation while still suppressing nearby weeds.
Double or triple layering provides better weed suppression but requires more time for complete decomposition. In areas with aggressive perennial weeds like bindweed or quackgrass, some gardeners use four to six layers, accepting that planting will be delayed by an additional growing season. The tradeoff between immediate use and thorough weed elimination depends on individual garden priorities.
Securing and Covering Cardboard
Bare cardboard exposed to sun and wind deteriorates unevenly and may blow away before establishing contact with soil. Cover cardboard with three to four inches of organic mulch—wood chips, straw, shredded leaves, or compost work well. The covering layer weights cardboard down, moderates temperature extremes, and adds additional organic matter.
Wood chips provide long-lasting coverage but decompose slowly and may temporarily tie up nitrogen as they break down. Straw decomposes quickly and looks tidy but can contain weed seeds if not properly sourced. Shredded leaves offer excellent coverage and decompose at a moderate rate, though they may compact in heavy rain. Compost provides immediate nutrients but may wash away on slopes.
In windy locations, briefly wetting cardboard before adding mulch helps it conform to soil contours and resist lifting. Some gardeners use landscape staples or stones around edges for additional security during the first few weeks until the cardboard settles and begins breaking down.
Planting Through Cardboard
For immediate planting needs, cut X-shaped openings in cardboard at appropriate spacing for your crops. Make openings just large enough for root balls—excessive cutting compromises weed suppression. This technique works well for transplants but is impractical for direct-seeded crops that require extensive soil exposure.
When planting through partially decomposed cardboard in established beds, check that roots can penetrate the remaining material. If cardboard has become compacted or waterlogged, it may form a barrier that restricts root growth. Break up or remove resistant sections rather than forcing plants to struggle through impermeable layers.
For vegetable gardens requiring annual tilling, cardboard mulching makes less sense as a permanent solution. However, many gardeners use cardboard for pathway suppression between raised beds or in perennial garden sections where soil will remain undisturbed.
Monitoring and Maintenance
Check cardboard-mulched areas monthly during the first growing season. Persistent weeds occasionally emerge through seams or thin spots—address these promptly by adding additional cardboard pieces or manually removing growth. Early intervention prevents weed establishment and seed production.
Monitor moisture levels beneath the cardboard and mulch layers. In dry climates or during drought, the covering may prevent rainfall from reaching soil. Water deeply but infrequently to ensure moisture penetrates to root zones. In excessively wet conditions, cardboard may become slimy and develop anaerobic conditions—improving drainage or temporarily pulling back mulch allows aeration.
As cardboard decomposes, it fragments into smaller pieces that integrate with soil. This process varies from four months in warm, moist conditions to over two years in cool, dry climates. The decomposition rate affects planning for subsequent plantings and determines when to add supplemental mulch or new cardboard layers.
Common Problems and Solutions
Slugs and sowbugs sometimes congregate beneath damp cardboard. While these organisms contribute to decomposition, large populations may damage young plants. Reducing excessive moisture and avoiding tight cardboard placement around plant stems minimizes pest issues. Periodic inspection allows early detection and intervention if populations become problematic.
Cardboard that remains too wet develops mold growth, which is generally harmless and contributes to decomposition. However, thick mold mats occasionally create water-repellent surfaces. Breaking up these areas with a garden fork or reducing irrigation allows better moisture penetration and air circulation.
Some persistent perennial weeds push through decomposing cardboard before completely dying. Thistles, bindweed, and horsetail have particularly vigorous regrowth capabilities. These species may require repeated cardboard applications over multiple seasons or integration with other control methods for effective management.
Integration with No-Till Gardening
Cardboard mulching aligns naturally with no-till philosophy by building soil structure without mechanical disruption. The decomposing cardboard and underlying vegetation create habitat for earthworms and soil microorganisms that improve drainage, aeration, and nutrient cycling. Over time, this biological activity develops rich topsoil without the compaction and organic matter loss associated with tilling.
In established no-till systems, periodic cardboard applications in pathways or between plantings maintain weed suppression while continually adding carbon. The technique works particularly well in combination with compost additions, creating a layered approach that feeds soil biology and suppresses unwanted growth simultaneously.
Environmental Considerations
Using recycled cardboard for garden applications diverts material from waste streams while providing functional benefits. However, sourcing considerations matter—cardboard that has been treated with fire retardants or antimicrobial chemicals may introduce undesirable compounds to garden soil. When possible, source cardboard from known origins or suppliers who can verify treatment history.
The carbon footprint of cardboard production includes energy for pulping, pressing, and transportation. While recycling and reusing cardboard in gardens is beneficial, the practice doesn’t negate these upstream impacts. Gardeners concerned with overall environmental effects might balance cardboard use with other mulching methods like cover cropping or locally sourced organic materials.
Long-Term Soil Effects
Repeated cardboard applications over multiple years gradually increase soil carbon content and improve structure. The decomposed cellulose fibers create channels that enhance water infiltration and root penetration. Studies of gardens managed with cardboard mulching for five years or more show measurable increases in soil organic matter and improved moisture retention compared to bare or conventionally mulched soils.
However, cardboard is carbon-rich relative to nitrogen, and excessive applications without balancing nitrogen inputs can temporarily reduce available nitrogen for plants. Alternating cardboard layers with nitrogen-rich materials like grass clippings, manure, or legume cover crops maintains balanced nutrient ratios and supports healthy plant growth.